To say that I am excited to have the amazingly talented Sarah from Ruffles & Rainboots guest post here at JENerally Informed today is an understatement. Sarah is the real deal. She is both creative as well as an entertaining and witty writer. If you haven’t checked out her blog you need to. I begged her to come guest post one of her creations and lucky for me she agreed. Take it away Sarah!

Hello, everyone! I’m Sarah from Ruffles and Rain Boots .com and I am so excited (and a little nervous) to be sharing here with you at JENerally Informed.
Over at Ruffles and Rain Boots, you can find us creating kid-centered crafts and learning activities, having fun designing decor and crafts for our home, and even whipping up some goodies in the kitchen… Okay, so maybe I’m more “monitoring the need for a fire extinguisher” than I am “whipping up goodies” in the kitchen.
What can I say? Cooking is not just my thing.
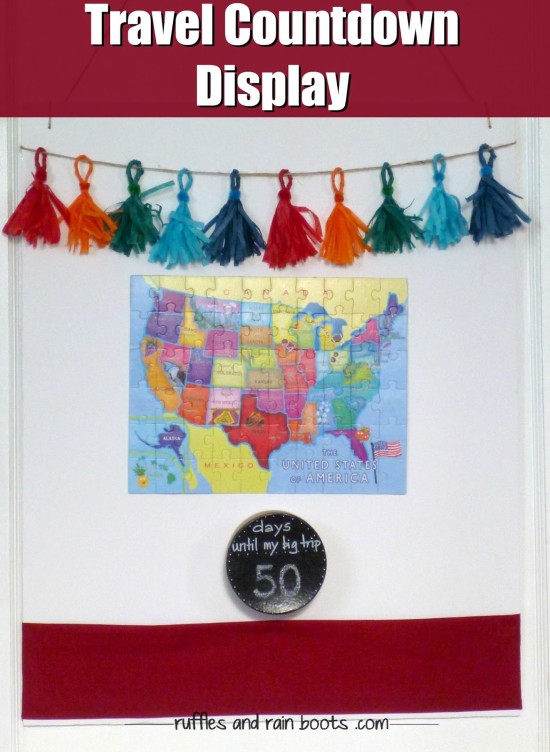
Our 2.5 year old, Elise, and I are taking a very long trip together without my husband, and we have just over 50 days until we head out. I thought a nice state trivia-filled countdown would be fun to pair with some tips for travel to help prepare her. In this tutorial for a simple travel countdown display, I also share a free printable for a state trivia game you can play on your next road trip or just for a bit of summer fun (and learning).
Because my daughter helped design this, there is a large amount of white space available for stickers. Obviously, if your child(ren) isn’t obsessed with stickers like mine, a travel countdown display could be much smaller. This is a very quick craft – I was able to complete everything (except assembling the display) in the span on one Curious George cartoon… Her one cartoon a day is a great time for crafting, and it is amazing how productive I can be in 30 minutes!

- 50 states trivia cards printable (free)
- American states puzzle (I got a 60 piece puzzle at the Dollar Store)
- craft box with lid (I got mine for $1.50 at a craft store)
- chalkboard paint (can make your own, but I had some on hand that cost about $3.00, with a coupon from JoAnn’s)
- scrap fabric
- foam board (I used one that we had that was damaged, but they run about $2.00)
- garland and hanger (optional)
- Mod Podge (or watered down school glue) and hot glue

Although it took me awhile to put them together, it will only take you minutes to print and cut out these free state trivia cards. The cards are just over 2 inches square, so they will fit in most containers you could choose for this craft.
My daughter is only 2.5 years old, so the trivia cards are fun facts about each of the 50 states. A few examples are:
- California raises more turkey than anywhere else in the nation.
- A public diamond mine exists in Murfreesboro, Arkansas.
- Connecticut gave us helicopters and hamburgers.


5 minutes
Elise and I assembled the puzzle together (on top of a piece of tin foil), and it was fun watching her match all the same color pieces. That’s where her involvement ended, though, and I moved the whole thing up to the counter and Mod Podge’d it. I did the front, let it dry for a bit, and then did the back. I then put it aside until I was ready to assemble the display.


3 minutes
The circle craft box was also a very quick piece of this project. I used some chalkboard paint I had from another project and just painted the top of the lid. I left it to dry for a bit while I was doing the garland, painted a second coat, and then put it aside until I was ready to assemble the display.


15 minutes
For the garland, I created a tissue paper tassel one very quickly. If you’d like to make this, hop on over to this tissue paper tassel fringe garland tutorial.
This garland, although only made of tissue paper, is very sturdy – the kiddo really gets a kick out of this thing, flicking it each time she goes past, and so far nothing has been damaged. This garland is a fun craft for older kids, and because it uses only tissue paper, pipe cleaners, and scissors, it’s one they can even do all by themselves. Again, I set it aside until I was ready to assemble the display.


In the pictures, you’ll see that I ended up moving the map down so that she could see it better once it was hanging on her door. I temporarily hung the map and the garland to make sure I could position everything in the right place.
To make the pockets, I took a strip of fabric 25 inches long by 4.5 inches wide. I ironed it (oh, the horror) and created a hem at the bottom (I used the selvedge edge to prevent fraying on the other side because I’m lazy). I then hot glued the hemmed edge at the bottom, folded the fabric up, and created a line of hot glue in the center of the fabric that would make two pockets. The final step was to wrap the ends around the edges and hot glue them down.
The fabric pockets at the bottom are more for me than for her. I wanted to have the supply of cards handy, as well as keep all of them together once she got them in the box each day.

I used hot glue to affix the bottom of the craft box to the foam board.

I taped up the garland in the back and also taped the puzzled on at its four corner points. I’d like to use this in a future learning activity, so I didn’t want to hot glue it to the foam board.
I punched two holes in the damaged foam core board using the smallest screwdriver from my, “my husband thinks these screwdrivers are the silliest little things ever” set. I then looped some twine through them for a hanger and hung it on her bedroom door.

Now, some might call me neurotic, but I believe parents can help to allay a lot of kids’ poor behavior when traveling, just by making them aware of what to expect. Jeff and I call it ‘situational awareness,’ but when I was growing up, my parents called it, ‘this is how you’ll behave in public and be mindful of others.’
Because air travel will be loud, crowded with summer travelers, and a new-ish experience for our toddler, a bit of preparation is going to be disguised as fun. I put one of the state trivia cards in the box, along with a travel tip, a bit of airplane knowledge or a “this is what you can expect” card. If you’d like to include these as well, some of the ones I’ve come up with are:
- Airports are crowded with lots of kids, but it isn’t a playground. Stay close to mom until she says it’s okay to play.
- Security lines and officers are there to help us. We will have to take off our shoes and put our bags on a belt, but they get to go through an x-ray machine!
- Airplanes are loud because of the big engines that help us to fly with the birds.
- When we’re trying to climb high in the air, your ears might pop. It’s a bit of pressure and then, POP! It might be hard to hear until they pop.
- It’s very important to stay in our seat, use our inside voice and be mindful of others. We will not put our feet on the back of the seat.
- The pilots sit in the very front of the plane, so they can see the clouds. We can’t go into that part of the airplane, because they’re very busy.

I’m basically making these up a few days in advance, based on how she reacts to the ones presented. She loves airplanes and I think it’s the airplane knowledge that really is fun for her.
Even though Elise and I will be going on this trip alone, Jeff and I will be taking her to the the Museum Of Flight as a family. Living in Seattle, we have access to Boeing’s amazing Museum of Flight and because of it, we’ll be able to introduce her to airplanes up close. Air Force One and the Concord are both there and we’ll even get to walk through and sit down in a 737! I’d say that’s a fun bit of preparation right there.
Thanks for reading through this and before you go, I’d like you invite you connect with Ruffles and Rain Boots on social media, via the blue buttons below. Also, I’d really like to know what your tips for traveling with little ones are. I could use all the advice you can give!
Stay connected with Ruffles and Rain Boots:


Stay connected with Ruffles and Rain Boots: